Follow Me On Social Media!
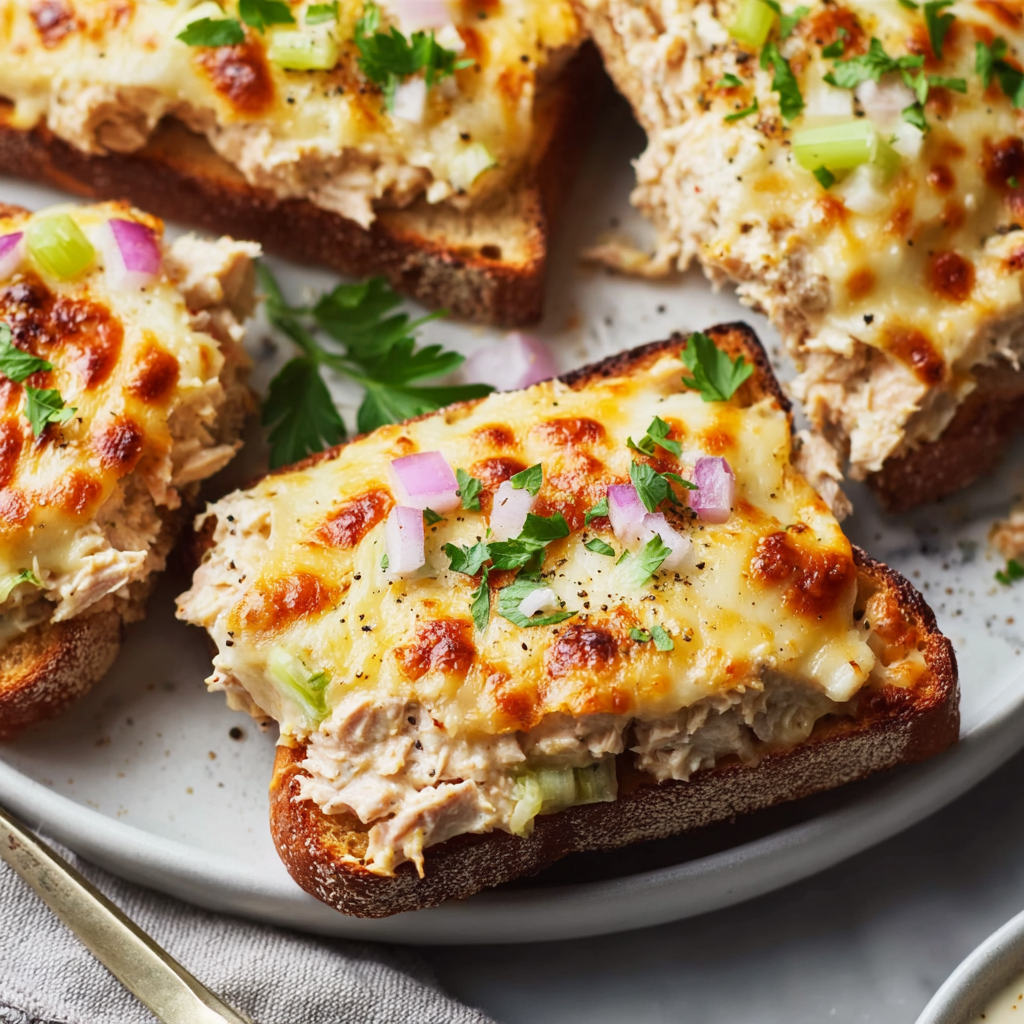
Sheet Pan Tuna Melts: The “Anti-Soggy” Structural Method
The Science of “Moisture Barrier” Layering
The biggest failure in a tuna melt is the “soggy bottom”—where the bread absorbs the moisture from the tuna and turns into a sponge. In 2026, we use Dual-Surface Crisping:
- The Butter-Toast Shield: We pre-toast the bread on the sheet pan before adding any toppings. This creates a “crust” on both sides of the bread. Then, we apply a thin layer of mayonnaise (rather than butter) to the interior side. Mayonnaise is a stable fat emulsion that acts as a moisture barrier, preventing the tuna juices from penetrating the crumb.
- Structural Venting: By placing the tuna melts on a wire rack over the sheet pan (optional but recommended), we allow hot air to circulate underneath, ensuring the bottom stays as crisp as the top.
Ingredients List
- The Foundation:
- Sourdough or Thick-Cut Rye (6–8 slices): Sturdier breads hold up better under the broiler.
- Softened Butter or Mayo (for the bread).
- The Tuna Emulsion:
- Canned Tuna (2 cans, 5 oz each): Drained very well.
- Mayonnaise (1/3 cup).
- Dijon Mustard (1 tbsp): Adds a sharp acidity to cut through the fat.
- Celery & Red Onion (1/4 cup each): Finely minced for “crunch” contrast.
- Dill Pickles or Capers (1 tbsp): Finely chopped.
- The “Meltdown” Layer:
- Sharp Cheddar or Gruyère (6–8 thick slices): Real slices melt better and offer more “pull” than shreds.
- Tomato Slices (Optional): Salted and patted dry.

Timing: The “Rapid-Broil” Schedule
- Prep: 10 minutes.
- Pre-Toast: 4–5 minutes.
- The Final Melt: 3–5 minutes.
Step-by-Step Instructions
Step 1: The Pre-Toast
Preheat your oven to 400°F (200°C). Butter both sides of your bread slices and lay them out on a large sheet pan. Bake for 4–5 minutes, flipping once, until they are lightly golden and firm.
Step 2: The “Dry” Tuna Mix
While the bread toasts, combine the tuna, mayo, mustard, onions, celery, and pickles.
Actionable Advice: Press the tuna against the side of the bowl with a fork to ensure it’s fully shredded and incorporated with the mayo. A “chunky” mix falls off the bread; a “creamy” mix stays put.
Step 3: The Moisture Barrier
Remove the toasted bread from the oven. Spread a very thin layer of plain mayo or mustard on the top side of each slice. This is your “shield.”
Step 4: The Build
Scoop a generous amount of tuna onto each slice. If using tomatoes, place them on top of the tuna and season them with a pinch of salt. Cover each melt with a thick slice of cheese.
Step 5: The Broil
Switch the oven to Broil (High). Return the pan to the top third of the oven. Watch closely for 2–4 minutes until the cheese is bubbling and has small brown spots.
Common Mistakes to Avoid
- The “Wet” Tuna: If you don’t drain the tuna liquid thoroughly, it will pool on the bread. Use a sieve or press the lid into the can until no more liquid escapes.
- Using “Plastic” Cheese: Avoid individual pre-wrapped singles. They contain higher water content and oils that separate, making the sandwich greasy.
- Cold Centers: If your tuna mix is straight from a cold fridge, the cheese might burn before the tuna gets hot. Let the tuna mix sit at room temperature for 10 minutes before assembling.
3 Modern Variations for 2026
| Style | The “Secret” Addition | Why it Works |
| The “Spicy Melt” | Pickled Jalapeños & Pepper Jack | Adds a 2026 “Hot Honey” vibe if drizzled at the end. |
| The “Everything” | Everything Bagel Seasoning on the crust | Adds massive texture and garlic/onion notes. |
| The “California” | Sliced Avocado (add after broiling) | Provides a fresh, creamy contrast to the hot tuna. |
Export to Sheets
Would you like me to suggest a “Tuna Melt Slider” version using Hawaiian rolls for a party-style appetizer?