Follow Me On Social Media!
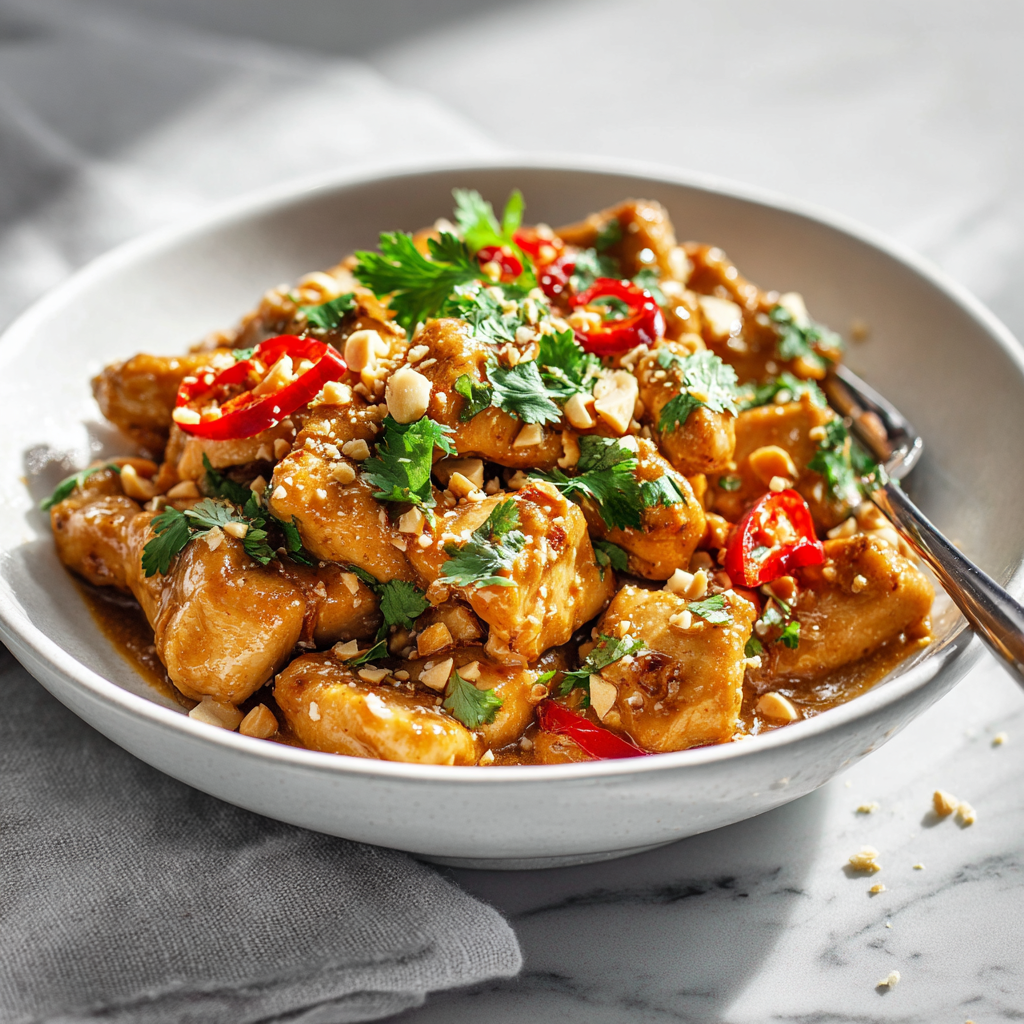
Thai Peanut Chicken: The Ultimate Balance of Five Flavors
Can a Single Sauce Master the “Flavor Pentagon”?
Did you know that authentic Thai cuisine is built on the scientific balance of five distinct pillars: Salty, Sweet, Spicy, Sour, and Umami? The common belief that peanut chicken is just “meat with peanut butter” ignores the chemical role of acidity and salt in cutting through dense fats. If you have been searching for a dish that delivers a creamy, restaurant-quality satay flavor with the freshness of a stir-fry, this Thai Peanut Chicken is the answer. By using the “emulsion-simmer” technique, we ensure the sauce clings to the chicken without breaking into an oily mess.
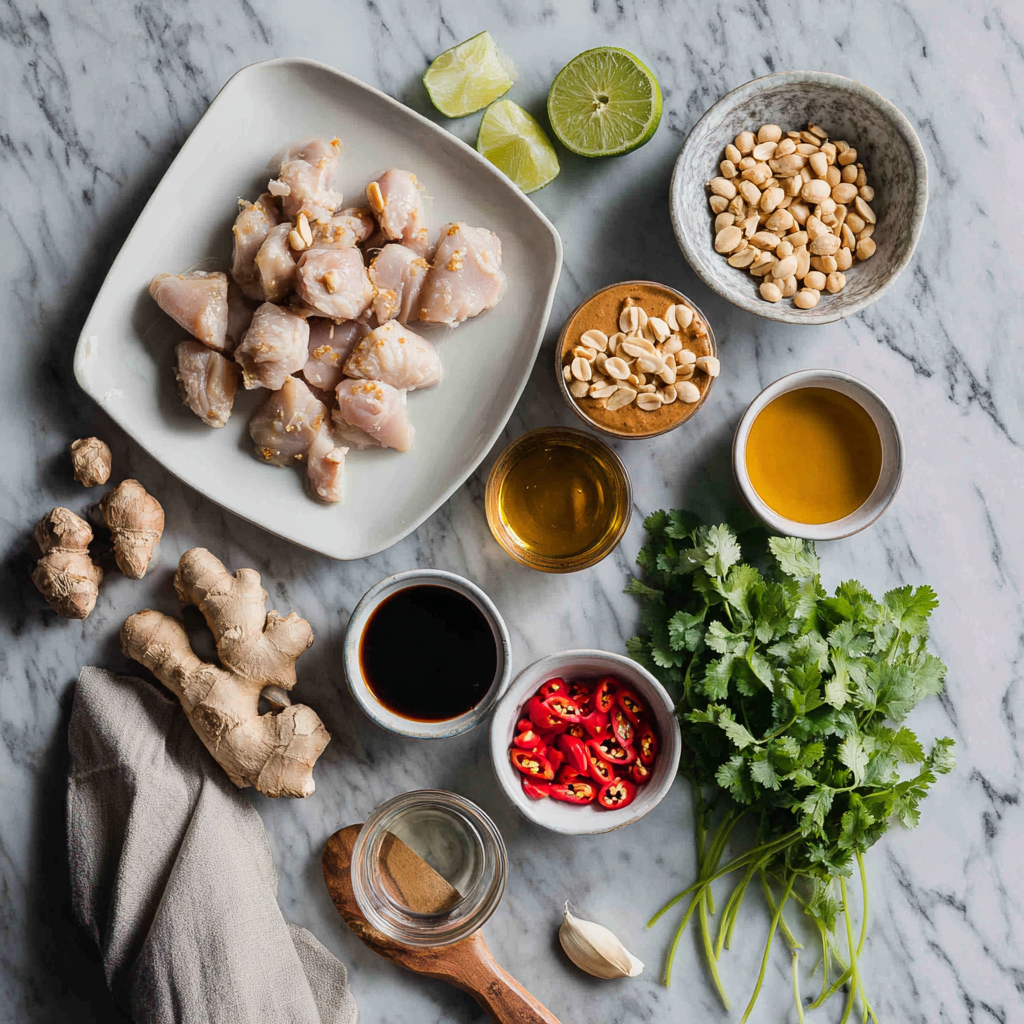
Ingredients List
- Chicken Breast or Thighs (1 lb): Sliced into thin, bite-sized strips.
- The Creamy Base: * Creamy Peanut Butter (1/3 cup): Use a natural variety for a deeper roasted flavor.
- Full-Fat Coconut Milk (1/2 cup): Provides the essential silken mouthfeel.
- The “Flavor Pentagon” Adjusters:
- Salty: 2 tbsp Soy Sauce or Tamari.
- Sweet: 1 tbsp Honey or Brown Sugar.
- Spicy: 1–2 tsp Red Curry Paste or Sriracha.
- Sour: 1 tbsp Fresh Lime Juice.
- Umami: 1 tsp Grated Fresh Ginger & 2 cloves Garlic (minced).
- Vegetables: 1 Red Bell Pepper (sliced) and 1 cup Snap Peas.
- Garnish: Crushed peanuts, fresh cilantro, and lime wedges.
Timing: High Heat and Rapid Reduction
Total time investment: 25 minutes.
- Prep & Slicing: 15 minutes.
- Cooking Time: 10 minutes.
Step-by-Step Instructions
Step 1: The Velvet Sear
Heat 1 tablespoon of oil in a large skillet or wok over medium-high heat. Sauté the chicken strips until golden brown and just cooked through (about 5–6 minutes). Remove the chicken from the pan and set aside.
Actionable Advice: Do not overcook the chicken here; it will simmer in the sauce later to reach perfect tenderness.
Step 2: The Aromatic Bloom
In the same pan, add a splash more oil if needed. Sauté the red bell peppers and snap peas for 2 minutes until bright but still crunchy. Add the garlic, ginger, and curry paste, stirring for 30 seconds until fragrant.
Step 3: The Sauce Emulsion
Lower the heat to medium. Whisk together the peanut butter, coconut milk, soy sauce, and honey in a small bowl. Pour the mixture into the skillet.
- Expert Insight: Stir constantly as the sauce heats. The peanut butter will initially look “broken,” but as it reaches a simmer, the coconut milk fats will emulsify it into a glossy, thick coating.
Step 4: The Integration
Return the chicken to the pan. Toss everything together for 1–2 minutes until the sauce has thickened enough to “rope” behind your spoon.
Step 5: The Acid Finish
Remove from heat and stir in the fresh lime juice.
Pro Tip: Adding lime juice while the pan is boiling can turn the citrus bitter. Adding it at the end preserves the bright, “Sour” pillar of the flavor pentagon.
Nutritional Information
- Calories: 380 kcal per serving.
- Protein: 32g (high-quality muscle support).
- Total Fat: 22g (healthy fats from peanuts and coconut).
- Saturated Fat: 9g.
- Total Carbohydrates: 14g.
- Fiber: 3g.
- Vitamin C: 80% of Daily Value (from the bell peppers).
Common Mistakes to Avoid
- Using Low-Fat Coconut Milk: This contains mostly water and stabilizers, which will prevent the sauce from becoming thick and creamy.
- Burning the Curry Paste: Red curry paste contains dried chilies that burn quickly. Keep it moving in the pan and add the liquids immediately once it smells toasted.
- Skipping the Ginger: Fresh ginger provides a “heat” that is different from chili; it’s essential for cutting through the richness of the peanut butter.
Storing and Reheating
- Storage: This dish keeps exceptionally well. Store in an airtight container for up to 3 days.
- Reheating: The sauce will thicken significantly in the fridge. When reheating, add 1–2 tablespoons of water or coconut milk to bring back the creamy consistency.
- Serving: Best served over Jasmine rice or rice noodles to soak up every drop of the sauce.
Would you like me to help you create a “Cucumber Ribbon Salad” recipe to serve as a refreshing side to this dish?